Welcome to the SourCitrus Suits DTD Tutorial!
Please read through this tutorial carefully and triple check you marked everything prior to sending your DTD to us! We want to build your suit as accurately as possible!
|
Materials Needed
All Purpose Coveralls (Painters Suit)
2-3 Rolls Of Duct Tape (ONE SOLID COLOR) Sharpie 2 Tall Items To Support Your Arms Scissors Paper Towels Water |
Step One: Positioning & The Start
|
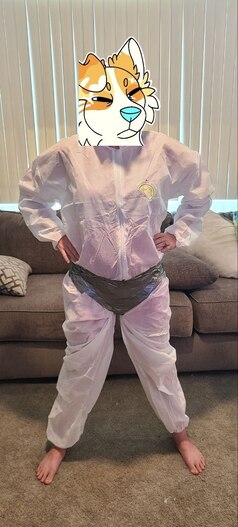
Positioning The Person
To make a perfect DTD, the person being wrapped needs to be standing in a specific pose. The person being wrapped should be standing with their feet square with their shoulders and both arms out in a T pose. The T shaped arms are VITAL to a correct fit! This is where items such as a broomstick, vacuum, pvc pipe, etc would come in handy as it alleviates the strain on the person's arms. Make sure they do not lock their knees as this can cause discomfort to the person being wrapped and prolong the process.
|

|
|
The Start Of The DTD
Time to begin the DTD. Take short strips of tape (around a couple inches long) and begin taping up the crotch. You want to essentially make undies out of duct tape. Tape around the waist at the belt-line in short strips of tape, around the legs entirely and on the crotch. Make sure there is no coverall peeking out from under the tape. We want a strong DTD!
|
Step Two: Taping The Legs & Heel
This is where things get tough! Please provide plenty of water and air to the person being taped! They may feel nauseous/dizzy and need a break!
|
Taping The Heel
Take a few sheets of paper towels and slide them under the person's foot. You want to wrap the paper towels around the foot and heel and tape it into place. This will provide us with exactly where your foot is so there is no guesswork! From there, tape around the entire ankle in short strips of duct tape.
|
|


|
Taping The Legs
Now begin taping up the legs horizontally from the ankle to the previous step. Remember, use short strips of tape for the best strength! Once you have one leg finished, begin taping the second leg. Once both legs are fully taped, take the sharpie and mark the front of the knee with a medium sized "X".
You may now cut up the side of the legs to relieve some pressure from the wearer. |
Step Three: Taping The Armpits & Arms
Please provide plenty of water and air to the person being taped! They may feel nauseous/dizzy and need a break!
|
Taping The Armpits & Wrists
Time to tape the armpits. Take some short strips of duct tape and tape around the wearer's armpit. Make sure you tape up over the shoulder during this as well to ensure a correct fit. Similar to the heel, take a few sheets of paper towels and wrap it around the wearer's wrist and part of their palm. Take a small strip of duct tape and secure the paper towel wrap before taping the rest of the wrist and palm.
|
|


|
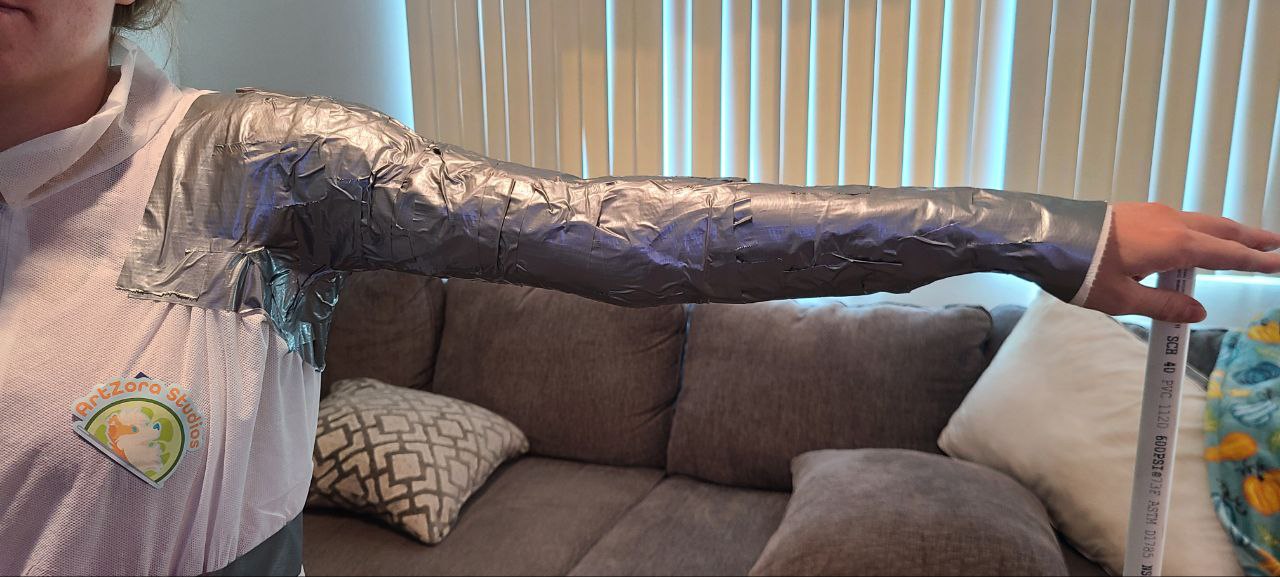
Taping The Arms
Now tape the entire arm of the wearer using vertical strips of duct tape. Triple check for any coverall peeking out from under the duct tape and once the arm is completely taped, move onto the other arm. Once both arms are taped, take a sharpie and mark the elbow with a medium sized "X".
You may now cut partially up the arm to relieve pressure from the wearer. |
Step Four: Taping The Front & Back
|
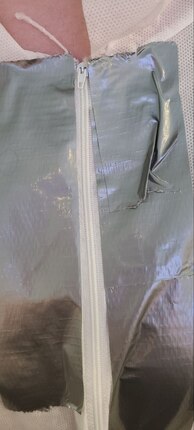
Taping The Front & Back
Begin to tape the front of the coveralls by placing long vertical strips of duct tape along the side of the front zipper. DO NOT cover the zipper of the coveralls! Once the strips of duct tape are placed alongside the zipper of the coveralls, you may begin taping the wearer using a mix of vertical and horizontal strips of duct tape. Use medium length strips during this and make sure to get every inch of the coveralls!
|
|

|
Finishing The DTD
Congrats! Your wearer is fully taped! Now time to label the final parts of the DTD!
Find the base of the wearer's spine and mark the spot with a circle and an X in the middle of it. This is where the tail slits will be placed on the bodysuit. If your suit has SPHs, please mark the appropriate areas with a line down the middle. This will be where the SPH Zippers are placed. Lastly, please write your characters name on the front of the DTD! This will help identify it! Now cut the wearer out carefully. |
Step Five: Packing The DTD
Please contact us for an address prior to shipping the DTD!
|
|
Taping Up The Cuts
Now that the DTD is off of the wearer, lay it out and begin to tape up where the legs and arms were cut. Use very small strips of duct tape to tape the cuts back up. Use a few layers along the cut to really strengthen it. Once all the cuts are taped up, you're good to go!
|


|
Packing & Shipping
Prior to packing the DTD, let it air out for a few hours. Once fully aired out and dry, you can fold the entire DTD up as flat and small as possible and get a box that will fit it. DTDs can usually fit into a shoebox sized box and does not require any packing materials. Pack it into the box, write your characters name on the OUTSIDE of the box and take it to your local post office to ship out to us!
|